Leap Motion
The Leap Motion is a hand and finger motion sensor using two infrared cameras and three infrared LEDs. The Leap Motion connects to your computer via USB and can be placed facing upwards, for example on a desk or keyboard, or sideways on a guitar or bass.Setting up the Leap Motion
Follow the steps below or watch this video that walks you through the process of setting up your Leap Motion so you can use it with Glover.
- Step 1 To be able to use the Leap Motion with Glover, you first have to install the Leap Motion driver which you can download from the Leap Motion website.
- Step 2 Run the installer and open the Leap Motion app, this will make the Leap Motion icon appear in your toolbar. This icon will will light up green when the Leap Motion is connected via USB.
- Step 3 Open the Leap Motion App from your Applications folder or click on the Leap Motion icon and select ‘Settings’.
- Step 4 On the General page make sure you have ‘Allow Background Apps’ ticked, as this will keep your Leap Motion connected to Glover even when, for example, you have your DAW running in the foreground.
- Step 5 In the Troubleshooting tab, click ‘Recalibrate Device’ to calibrate your Leap Motion. Note: the Leap Motion uses infrared cameras to track your hands, so for it to work reliably darker lighting conditions are recommended.
- Step 5
In the Troubleshooting tab, click Diagnostic Visualizer to check whether your hands are being tracked correctly.
You are now ready to use the Leap Motion with Glover!
The Leap Motion device in Glover
This video walks you through the Leap Motion device in Glover.Using a Leap Motion device in Glover is virtually the same process as any other device like the MiMU Gloves or Gliss. For more information on Devices and how to use them, check out the Devices page of the Glover documentation.
Make sure your Leap Motion is connected to your computer and add a Leap Motion Device in Glover. Once you hold your hand over the Leap, the icon in the devices pane will go orange to signal the Leap is tracking your hand.
Click on the device to open its inspector with a more detailed description of its inputs.
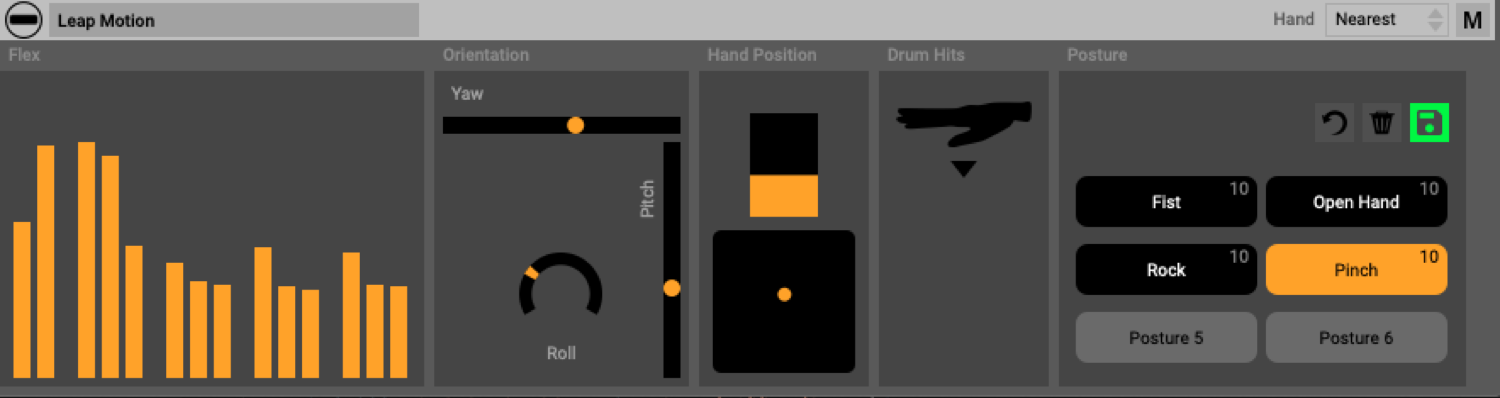
Inspector panels
In the inspector you can view the inputs from your Leap Motion so you can test. Each panel shows a different input set.
- Flex Panel
In the Flex Panel you can see the individual bend of each of your fingers. Click on the panel to switch between the
graphic view or to the direct imaging of the IR cameras.
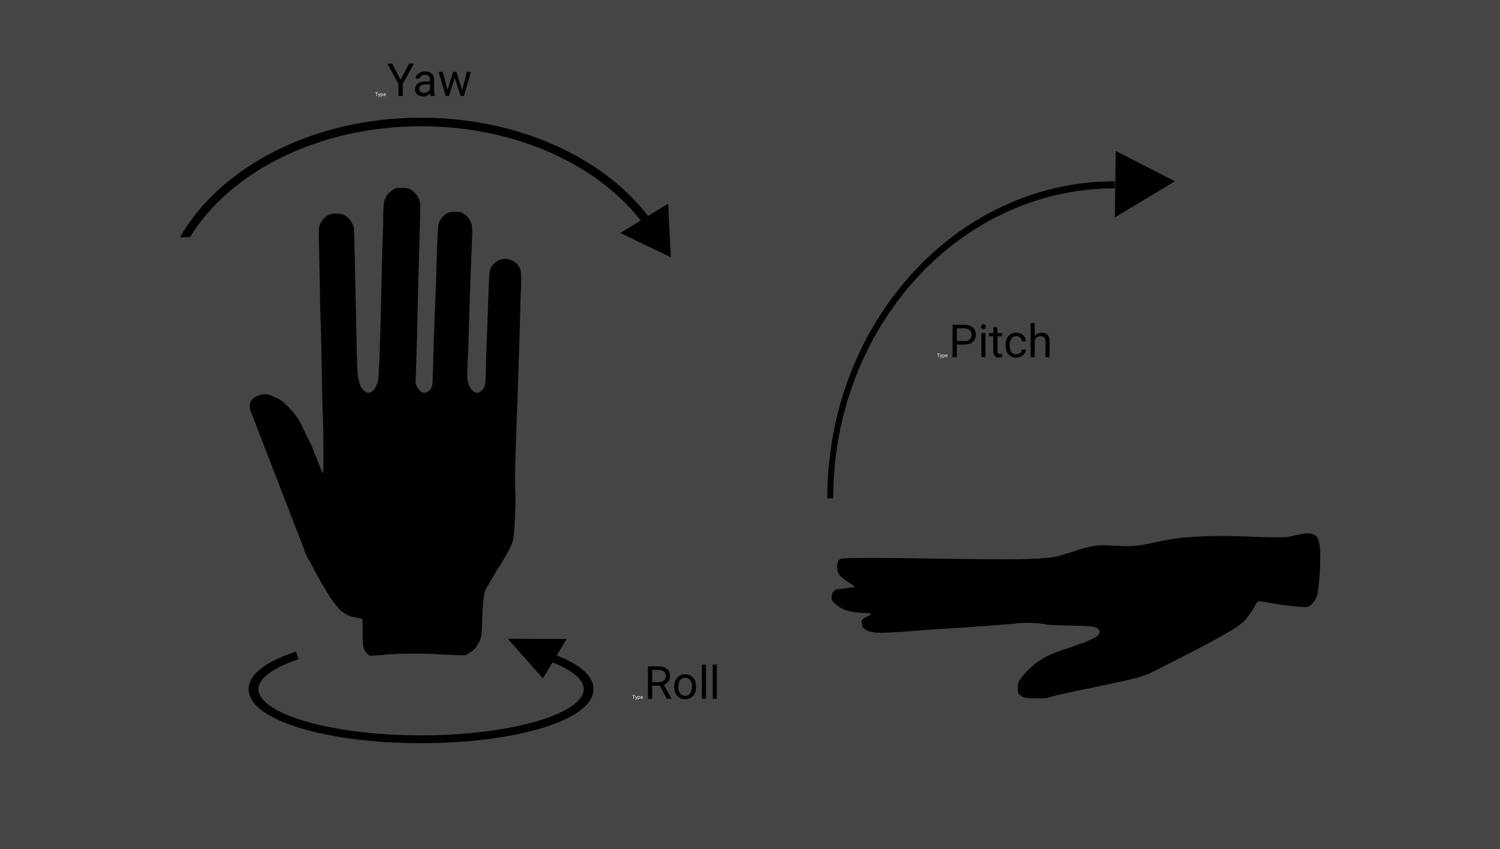
- Orientation Panel
Most devices will have an Orientation panel in which you can view the real-time movement inputs of you device. These
movements
have three components: Pitch, Yaw and Roll.
Pitch is the vertical movement of your hand, measured from the angle of your wrist. So Pitch is measured from when your fingers are pointing down to the Leap Motion to when you are pointing all the way up to the sky.
Yaw is the horizontal movement of your hand. The palm stays above the Leap and you twist wrist so your fingers are pointing left or right.
Roll is the rolling movement of the wrist, from palm up to palm down.
- Hand position
The Hand position panel shows you the absolute position of your hand above the Leap. The top square shows you the height
of your hand. The maximum height that the Leap can see can be adjusted in the settings of the Leap Motion app.
The bottom square visualises the left to right and front to back movement over the Leap.
- Drum Hits
The Drum Hit panel visualises the peak that is measured when you do a drum hit above the leap.
- Posture Glover can be trained to recognise six different Postures for the Leap Motion like ‘Fist’ or ‘Open Hand’. Postures are saved with the device.
In the training panel on the right hand side of the screen there are six labels. Four of these are pre-labeled “Fist”, “Open Hand”, “One Finger Point” and “Pinch”. You can rename a posture by right-clicking (or Ctrl-clicking) on a posture and selecting “Rename posture.” Postures can be renamed at any time and new names will propagate immediately throughout all your mappings.
Train a posture by clicking the label of the posture you want to train while making the posture with your hand. Click a few times to get several examples of the posture. You can make the posture slightly different each time you click to get a varied set of examples (you might not always make the posture exactly the same). Once this has been done click the save icon, and your postures will now be saved.
- Posture Recognition For the best posture recognition it is recommended to train only a small number of different postures. But if you do want to use all six posture options, try to choose postures that are as different from each other as possible. For example, the difference between “Fist” and “Open Hand” will be recognised more accurately than “Straight One Finger Point” and “Slightly Bent One Finger Point”.
Making mappings
Making mappings with the Leap Motion has the same process as any other device. Visit the Mapping page of the Glover documentation to read more about this topic or watch this tutorial videoHand choice
In the toolbar of the inspector you can select which hand you want this Leap Motion device to detect.
Choose 'Nearest'
if you want to control your mappings with either hand.
If you want to make mappings that are specific to each individual
hand, you can add another Leap Motion device and choose 'Left' for one and 'Right' for the other. The Leap Motion can
track two hands at the same time so you don’t need a second Leap Motion for this. Hold your hands close enough to each
other so the cameras can see both hands but make sure not to overlap them, as it will make it difficult for the Leap
Motion to differentiate between the two.
Adjust the name of two Leap Motion devices to signify which one is the left and which one is the right.
By doing this you can make mappings that include both hands, for example: Leap Motion Left Fist + Leap Motion Right Open
Hand.
Inputs
The Leap Motion has the following inputs that you can use in your mappings
- Flex
Use the flex data of parts of each finger. These are movement inputs.
- Orientation
Movement inputs for Pitch, Yaw and Roll. These inputs can be combined with a qualifier like a posture or Hand Tilt.
Hand position
- Hand Position
Movement inputs for Height, Front-to-Back and Left-to-Right as visualised in the Device Inspector. These inputs can be
combined with a qualifier like a posture or Hand Tilt.
- Hand Tilt
These are qualifiers and can be combined with a movement like orientation or an event like a drum hit.
- Drum Hits
The Leap Motion can detect two types of drum hit, drum hit up and drum hit down. Drum Hits are events and can be
combined with a qualifier.
- Gestures
A collection of unique Leap Motion gestures that are different types of inputs. The swipe gestures are events. Pinch
amount measures the space between your thumb and index finger and can be used as a movement. Grab is essentially a fist
without having to train it as a posture. Grab is a qualifier so it can be used in combination with a movement or event.
- Posture
You can train up to six different postures for the Leap Motion. Click here to read more about postures and how to train
them.
- Tracking ‘Is tracking hand’ will be active when your hand is over the Leap and the icon in the device pane is orange. You can use this input as a qualifier. It’s also useful to invert this input (Right click on the input in the inputs panel of the mapping), so that you can send a message once the Leap stops tracking.